Fiber optic internet connections are rapidly becoming a critical part of data networking and global communications. In other words, it’s pretty important. Everybody loves the speed and reliability of this relatively new internet type, but sometimes something goes wrong inside the cable.
That’s when the call goes out like the bat signal in the sky for a qualified cable splicer.
Installing, maintaining, and repairing fiber optic cable isn’t rocket science, but it requires specific tools and skills. The primary skill you need to keep your fiber network tuned and operational is learning how to splice fiber.
While the fiber cable splicing procedure might be different than anything you’ve done before, a little practice and you’ll have it down.
So, what is fiber optic splicing? We thought you’d never ask. Buckle in, and let’s learn all about it.
Understanding Fiber Optic Cable
Before diving into splicing, it’s helpful to understand how fiber optic cable works and why it’s the backbone of modern internet connectivity. Unlike copper-based technologies that transmit signals electrically, fiber uses pulses of light, which allow data to move at near-instantaneous speeds with far less interference.
How Fiber Differs from Other Internet Types
- DSL (Digital Subscriber Line): Internet travels over the copper wiring of your telephone line. While widely available, DSL is slower due to bandwidth limitations and signal degradation over distance.
- Cable: Uses the same coaxial copper lines that carry your cable television signal. Cable internet can deliver higher speeds than DSL, but performance often drops during peak usage times since bandwidth is shared among local users.
- Fiber: Uses glass filaments, thinner than a human hair, to transmit information via light pulses. This enables faster, more consistent, and more reliable speeds, and more resistant to distance and neighborhood congestion degradation.
Since fiber works differently from copper technologies and the cabling is more complex, maintaining its integrity requires a specialized process: splicing.
Why Fiber Splicing Matters
Splicing is the process of joining two fiber optic cables so they function as one continuous strand. This is a fundamental skill in fiber installation and maintenance. Without splicing, technicians couldn’t repair damage, extend existing networks, or integrate new connections. Poor splicing will affect signal strength, reliability, and overall network performance.
When Does Fiber Need to Be Spliced?
- Repair Cable Damage: Environmental factors, construction accidents, or even wildlife can damage fiber lines. Splicing is required to repair the connection and restore service.
- Join Multiple Cables: Expanding a network across an office complex, campus, or new neighborhood often requires linking two or more cables seamlessly.
- Extend Cable Length: Sometimes a cable run falls short of the distance needed. Splicing allows an additional length of cable to be added without starting over.
Tools Needed for Fiber Splicing
Because fiber cores are so small, even tiny imperfections can cause major issues. That’s why proper tools are critical. At a minimum, you’ll need:
- A fusion splicer or mechanical splicing kit (depending on method).
- A fiber optic cable stripper to carefully remove protective coatings.
- High-quality cleavers to ensure clean, flat breaks.
- Fiber adapters, cleaning supplies, and protective sleeves.
The accuracy and cleanliness of your tools directly affect splice quality. Even a microscopic particle of dust can cause signal loss.
Fiber Splicing Methods
There are two main methods of fiber optic splicing, each with its own strengths:

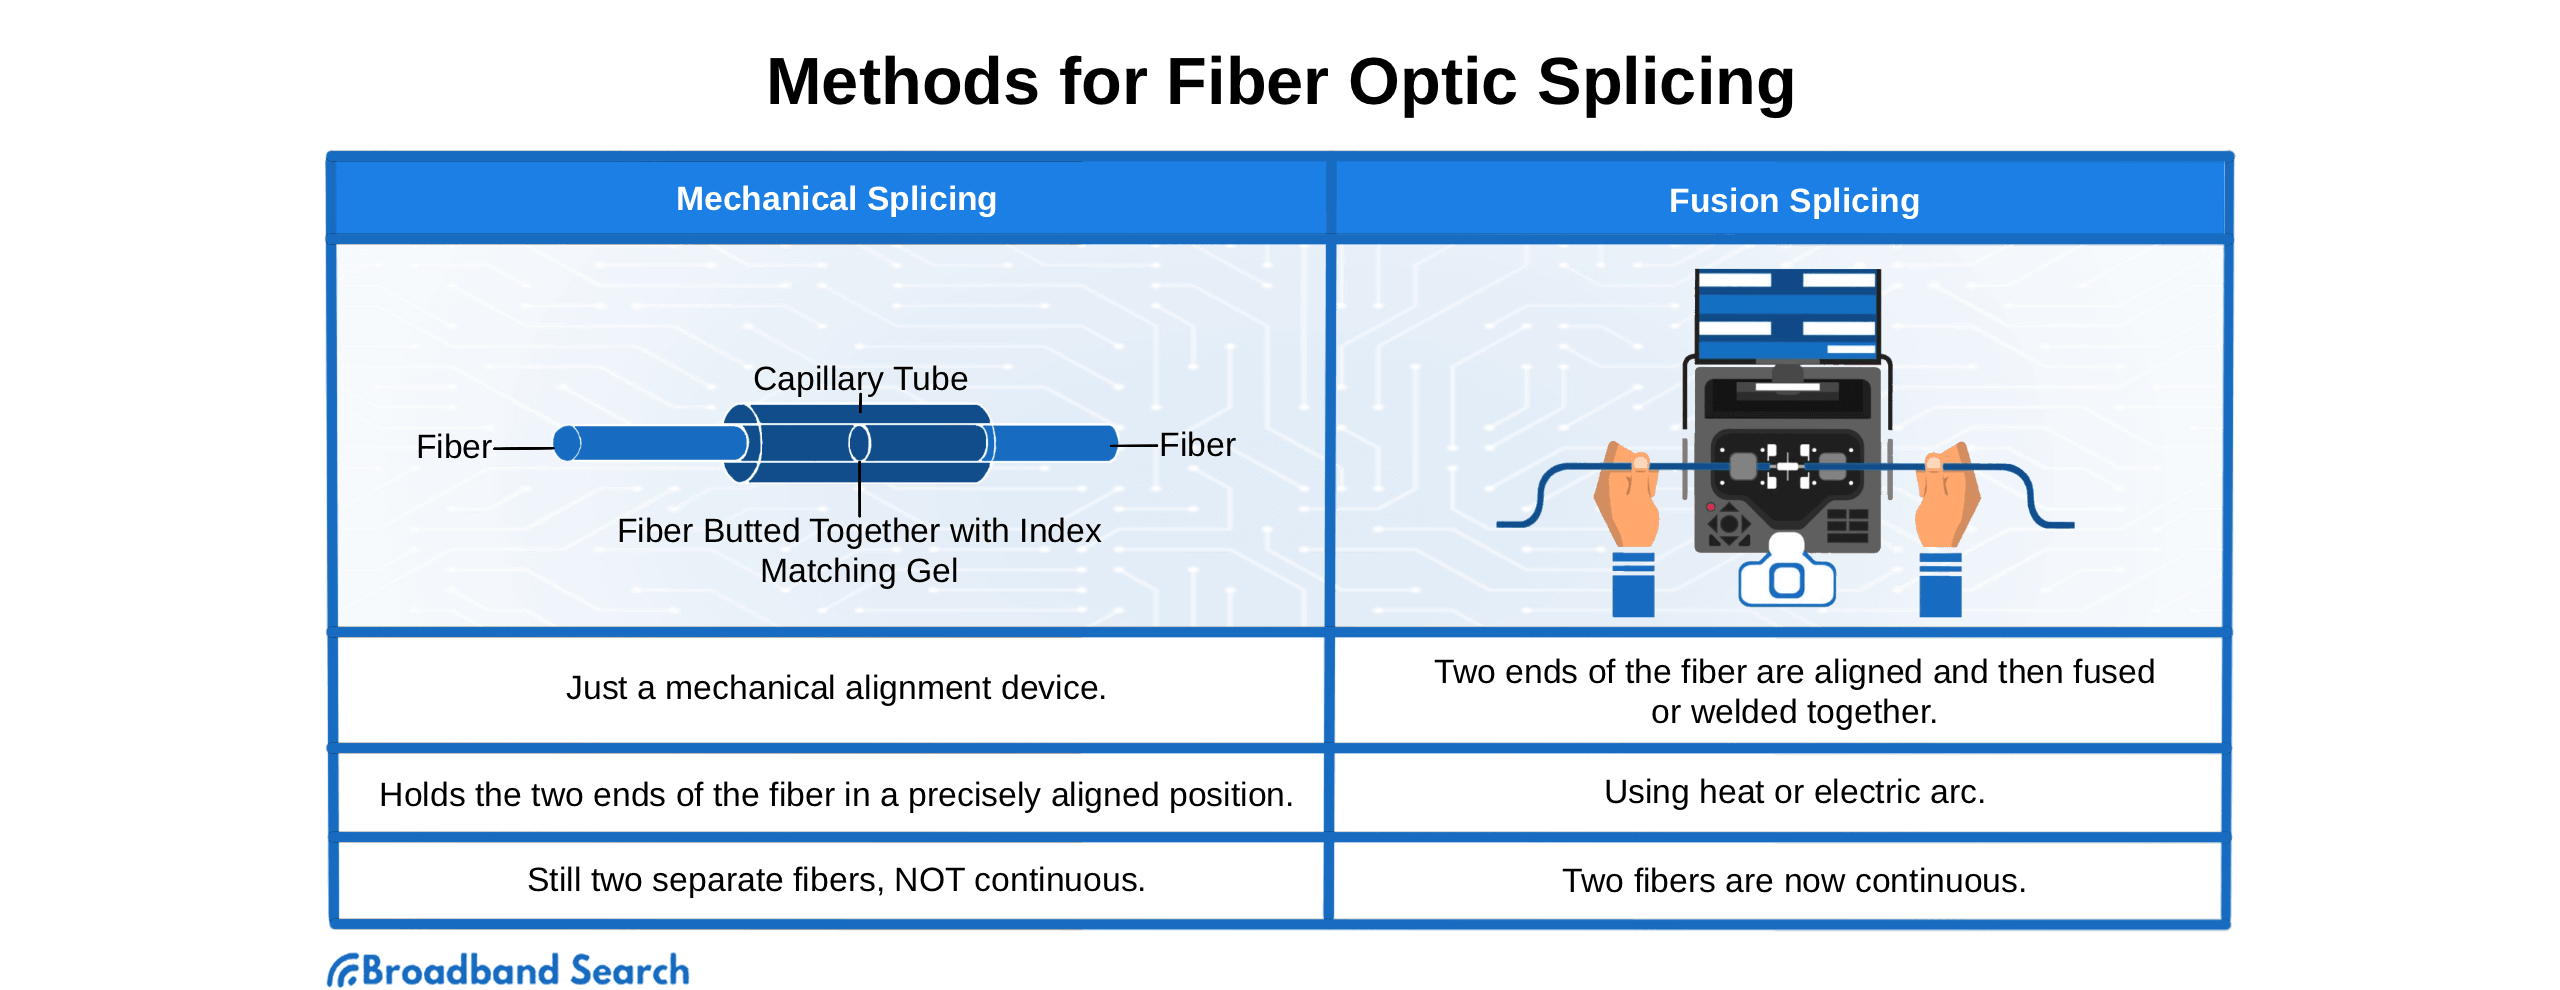
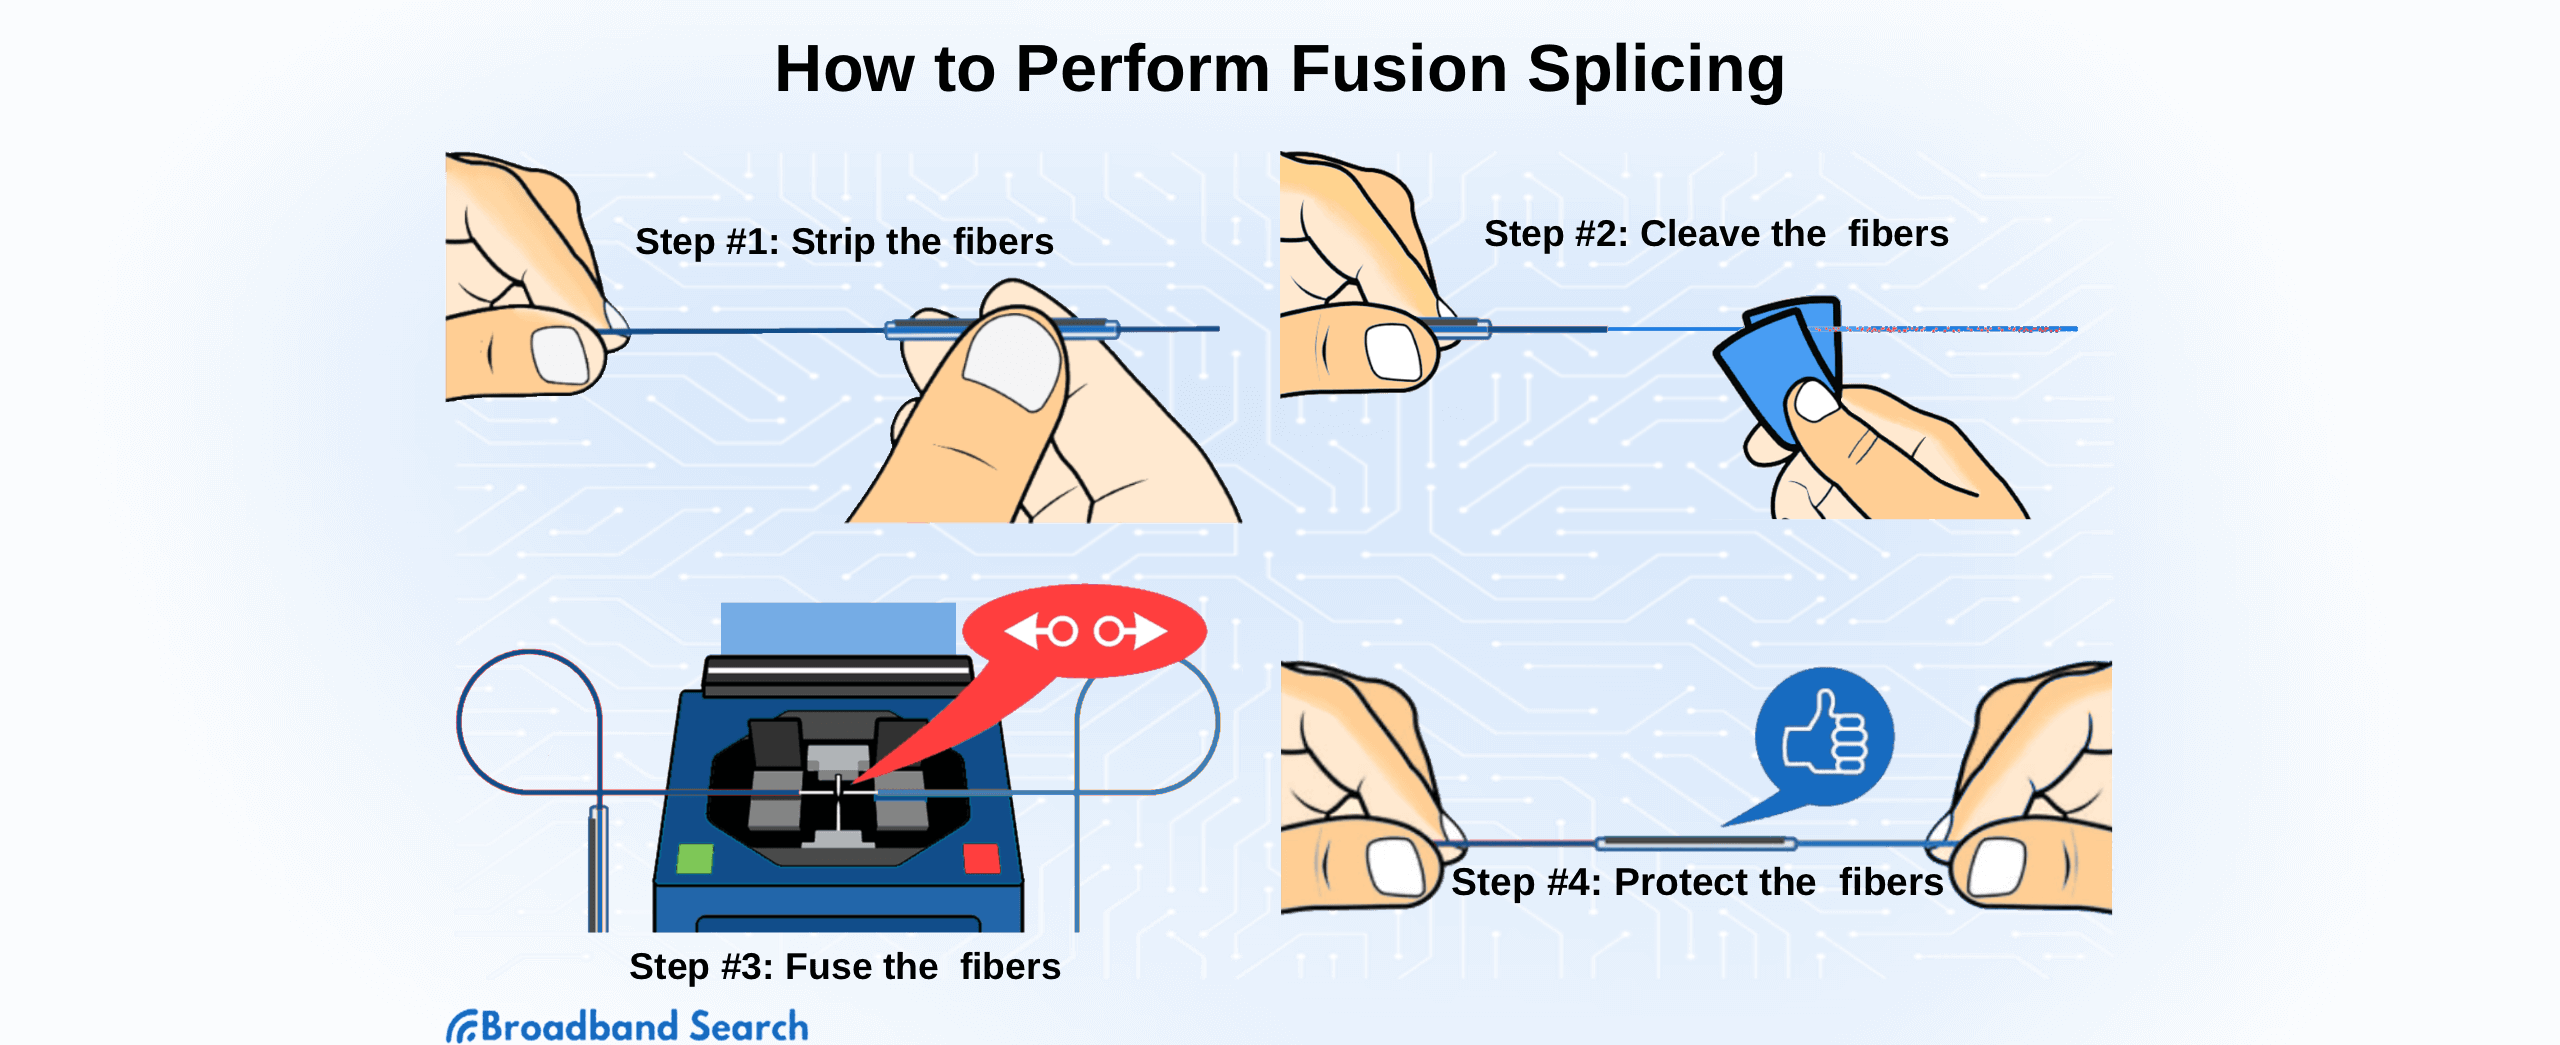
- Mechanical Splicing: The ends of two fibers are stripped, cleaved, aligned in a mechanical device, and joined with index-matching gel. This method is quick, requires less equipment, and is ideal for temporary or emergency repairs. However, it introduces slightly higher signal loss. Learn more about mechanical splicing.
- Fusion Splicing: Uses an electric arc to melt and permanently fuse two fibers into one continuous strand. This method produces the lowest signal loss, strongest connection, and longest-lasting results. It requires more skill and a higher initial investment in equipment. See fusion splicing details.

Choosing the Right Splicing Method
The decision between mechanical and fusion splicing depends on three key factors:
- Cost: Mechanical splicing tools are cheaper upfront but cost more per splice. Fusion splicing equipment is expensive but cost-efficient long term.
- Performance: Fusion splicing offers the lowest signal loss and best durability, making it the preferred method for permanent installations.
- Time & Environment: Mechanical splicing is faster and more convenient for field repairs. Fusion splicing is better suited for planned builds where reliability is critical.
Pro Tip: In practice, many technicians use a quick mechanical splice to get service back online, then replace it later with a fusion splice for durability.
Best Practices for Fiber Splicing
Before Splicing
- Maintain clean tools and fibers: Always wipe with isopropyl alcohol to prevent signal interference.
- Take care of your cleaver: Precision cutting is essential for accurate signal alignment.
During Splicing
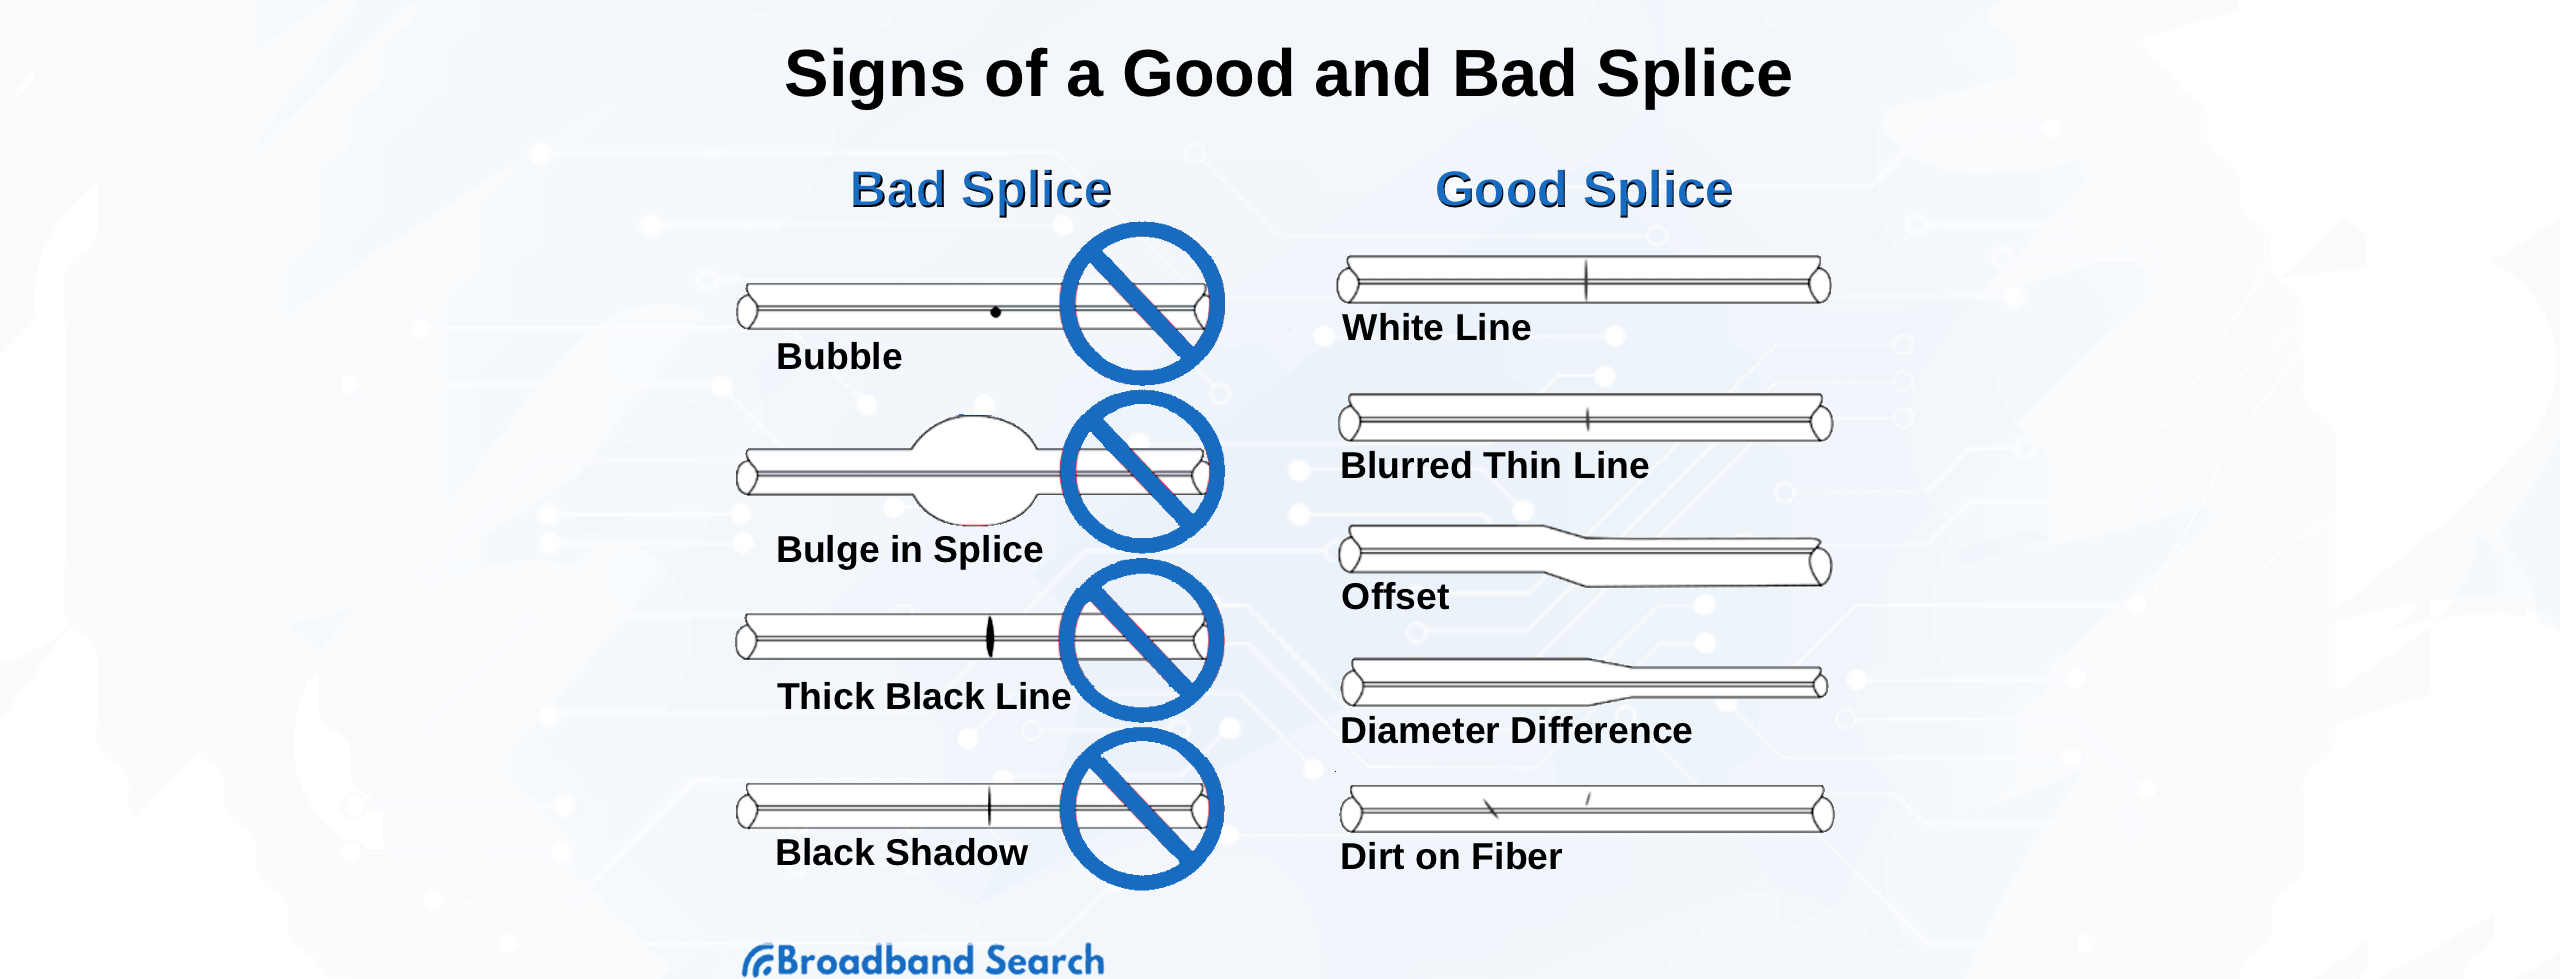
- Inspect your work as you go: A good splice is nearly invisible, while a poor splice shows bubbles, bulges, or dark lines.
- Ensure precise alignment: Even a slight misalignment can increase signal loss.
After Splicing
- Protect your splice: Use heat-shrink sleeves or splice enclosures to guard against environmental damage.
- Test every splice: Verify quality with an OTDR test to ensure signal strength and long-term reliability.

What should you look for when trying to tell which splices are good and which are bad? And remember, a bad splice can cause severe signal degradation, enough that your connection could become unusable. In other words, it’s worth knowing the difference.
Bad Splice: Look for bubbles, bulges, black shadows, or a thick black line at the splice. These are all signs that something is amiss.
Good Splice: On the other hand, a good splice is evidenced by a transparent, non-reflective splice area. Look for a white line or a blurred thin line at the splice. The fewer flaws noted, the better, but flaws aren’t necessarily a sign of a degraded signal. For example, the wire itself might exhibit an offset while the actual optic fibers inside are perfectly spliced. The only real way to get where you can discern these features at a glance is through experience, but it would be a good idea to put this article somewhere you can find easily for reference.
Set Fusion Parameters Systematically
A last hint that hopefully won’t sound too wonky. Like the title up there says, when using your fusion splicer, you don’t want to be randomly spinning up different settings all the time the first time a problem surfaces.
When we say settings, it’s mainly a reference to fusion time and fusion current. It’s these features that have the most effect on the splice quality. If you’re having trouble, change only one variable at a time and only a little bit at a time as you try to zero in on the best result.
Each job might require slightly different settings since fiber cable is not uniform. The bottom line here is not to start spinning dials and twisting knobs randomly. Take your time. Focus on patience and precision.
If you don’t, you’re going to mess up a lot of splices and end up with…anyone care to guess? Signal degradation!
Final Thoughts
When we talk about fiber optic networks, we’re talking about splicing. It’s impossible to install, repair, or maintain a workable product unless you have splicing down very, VERY well. There’s probably not another singularly important technique to master when working with this new type of internet connection and its accompanying material. Without mastering the knowledge of splicing, you might as well forget about having a quality fiber connection.
As you head out into the wild, blue yonder of fiber cable splicing, don’t be intimidated by the technology. You have two methods to learn, mechanical and fusion. Once you have them down, it’s practice, practice, practice.
While fiber optic internet is just coming into its own and is available to only a small percentage of Americans presently, expect that to change as internet service providers build out new infrastructure to carry this speedy new connection technology. For a list of fiber optic services available in your area right now, drop your zip code into our free search tool.
Keep in mind that this is a field where service is expanding rapidly. While the list of local providers might not be impressive now, expect things to change quickly.
FAQ
How long does a fiber optic cable last?
There are a few considerations to think about in answering this question. In general, a fiber optic cable is designed to last 20-25 years under normal conditions. Exposure to extreme environmental conditions could shorten that considerably. What will likely shorten it, even more, is advances in the field that require old technology to be upgraded.
Can water damage fiber optic cable?
While the critical glass fibers at the center of a cable are waterproofed in several different ways, they are quite able to be damaged by water if it manages to penetrate that far. In short, water will either seriously degrade or destroy the signal entirely.
Is fiber optic splicing a good career?
Fiber optic splicing offers excellent opportunities as a career. Due to the relative newness of the technology, the demand is high, which causes the pay to be above average, perhaps as high as $50 an hour.
How do I become a splicer technician?
No college degree is required. Your best bet to get into the field quickly would be to complete any of several certified technical programs offered through dedicated tech schools or junior colleges. You could be working within a matter of months.
What are the challenges of fiber optic splicing?
There are two primary challenges involved in fiber optic splicing. The first is the nature of the work itself, which requires dexterity and fine motor control when working with sensitive material. Secondarily, the field is advancing so rapidly that you need to be able to implement new tools and techniques regularly.

